4 mins read

Related topics
Priding itself on being one of the UK’s leading independent non-contact metrology specialists, Optimax Imaging Inspection and Measurement provides expert application-specific solutions to the most demanding of metrology problems. From its purpose built premises in Market Harborough, Optimax’s team of 30 staff provide sales, support, training, maintenance and calibration services to customers operating in a large number of diverse industries; ranging from Aerospace, Defence and Automotive to Medical, Forensics and Precision Engineering.
Optimax’s calibration laboratory has been UKAS accredited against ISO 17025, the international laboratory standard, since January 2015, covering the calibration of a variety of microscopes, profile projectors, together with 2 and 3 axis non-contact coordinate measuring instruments. Explaining the reasoning behind opting for UKAS accreditation, Pete Clements, Managing Director at Optimax said: “UKAS accreditation is the gold standard for calibration laboratories. It demonstrates to our customers that we are serious about our commitment to delivering high quality, consistent calibrations, year after year. It gives them confidence that their equipment is being tested against the highest possible internationally recognised standards, using a reliable and repeatable methodology to ensure accurate results.”
In addition to confirming the technical competence of a calibration laboratory, accreditation to ISO 17025 also verifies that the calibration of the measurement standards used in the laboratory can be traced back to the definition of the relevant SI units (International system of units). This not only ensures reliable measurements are given, but that the accredited calibration certificate is metrologically traceable. The metrological traceability is both an important part of meeting the ISO standard and can also provide access to potential client marketplaces, as Pete Clements explains:
“Most formal ISO quality management standards demand traceable calibration certificates, and having the UKAS accreditation mark on these certificates meets that requirement. Traceability is very important to our customers, particularly those in the Automotive, Aerospace and Medical areas. Although using UKAS accredited services is not a legal requirement for these sectors, it does contribute towards compliance with industry sector quality management standards such as IATF 16949:2016 (Automotive) and AS9100 (Aerospace). Being UKAS accredited is often a pre-condition for tendering for contracts in these sectors, without it we would not be in a position to deal with many of these clients.”
In 2016 UKAS granted Optimax the UK’s first accreditation for the verification of coordinate measuring machines (CMMs) equipped with imaging probing systems against the ISO 10360-7 standard. The accreditation covers all brands of manual and CNC vision coordinate systems. Pete Clements said: “Accreditation to ISO 10360-7:2011 plugs a gap in the frontline traceability chain, which has previously been filled with non UKAS traceable certification. Customers now have a choice between OEM and externally audited UKAS certification, which has got to be a good thing for the future and provide greater confidence in the vision market as a whole.”
Pete continued: “Optimax sees the verification of vision measuring instruments as an important addition to the company’s portfolio of UKAS accreditation. Providing an independent source of accredited calibration to a recognised international standard is vital in reassuring customers that the vision systems they are investing in and using are fit for purpose and remain so on an ongoing basis. The standard ensures a clear instrument specification is agreed and the comprehensive certification reflects the performance of the system as a whole, rather than of its disparate components. It tests not only the standard linear XYZ precision, but then goes on to add the errors associated with mechanical and optical squareness, the sensor, video imaging tools and what happens when you combine those errors. It reflects true performance in everyday use, a benefit to customers allowing them to assess the suitability of the instrument for its application.”
In addition to its customers, Optimax itself has benefited from going through the accreditation process: “The external independent scrutiny that UKAS accreditation provides, helps maintain internal operating standards. It offers an opportunity to challenge and fine tune long-established operating processes and behaviours and ensure they meet or exceed industry best practice. Our engineering staff are rightly proud of our accredited status as it plays a pivotal role in both technical up-skilling and contributing towards continuous improvement across the whole business. We truly value our annual external UKAS assessment.” – Pete Clements

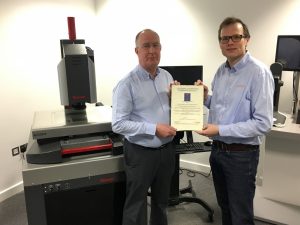
Matt Williscroft, Quality Manager, & Pete Clements, Managing Director
Background – Starrett AV350+ High Precision Multisensor Vision System